
Frequently Asked Questions
Welcome to the Frequently Asked Questions section. Find quick answers and detailed information on common topics by selecting an option below. We are continuously adding new content, so check back for updates and make sure your refresh your screen to view the newest content. You will also find several video tutorials at the folloowing link: https://snap2close.com/portal-tutorials.html
How do I place a new order
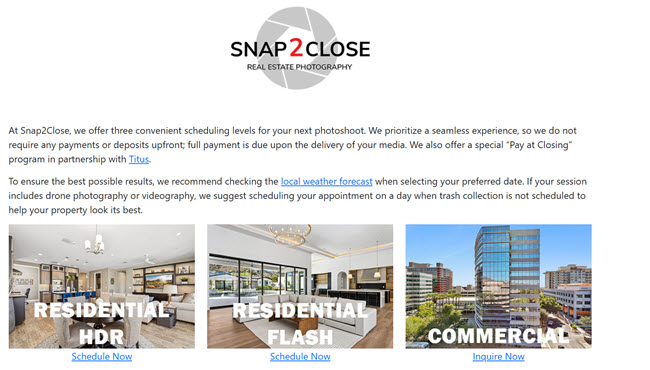
there are two ways to place a new order. Please click ORDER on the Snap2Close website’s menu. This action will open up our Schedule screen. Please click the type of photoshoot you are looking for.
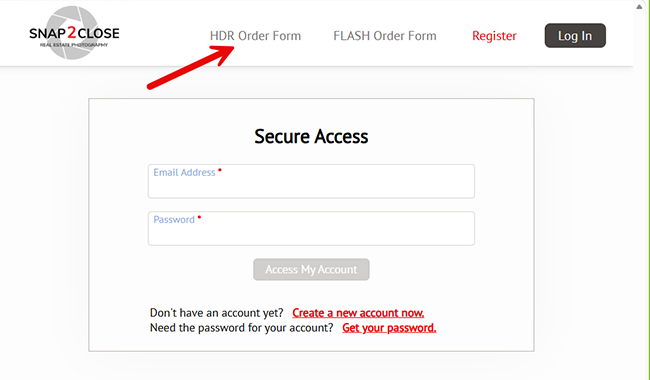
The other option is to visit our portal landing page at view.snap2close.com. At the top of the screen you will find links to our HDR Order Form and FLASH Order Form.
What is a customer portal
A customer portal is a secure, authenticated online platform allowing you to place and reschedule orders, view your listings, use the Marketing Kit, and manage specific information for your account. You can change your password, update your credit card, change your email address and much more!
How do I register for an account?
Step 1: Please click Login on our menu on our menu. This opens our portal link which is view.snap2close.com.
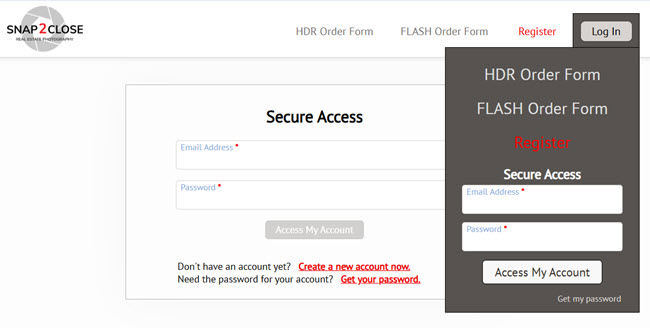
Step 2: Click the Log In button at the top right of the menu.
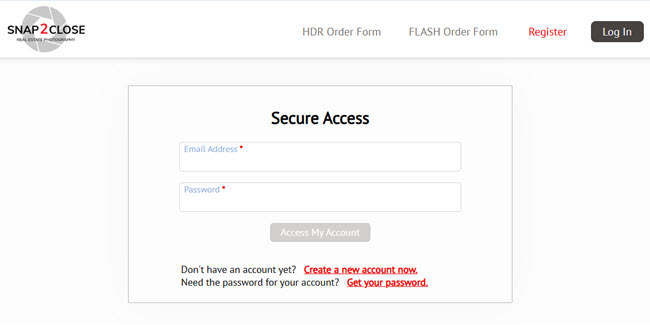
Step 3: This action opens up the portal screen. Please click on the red Register text.
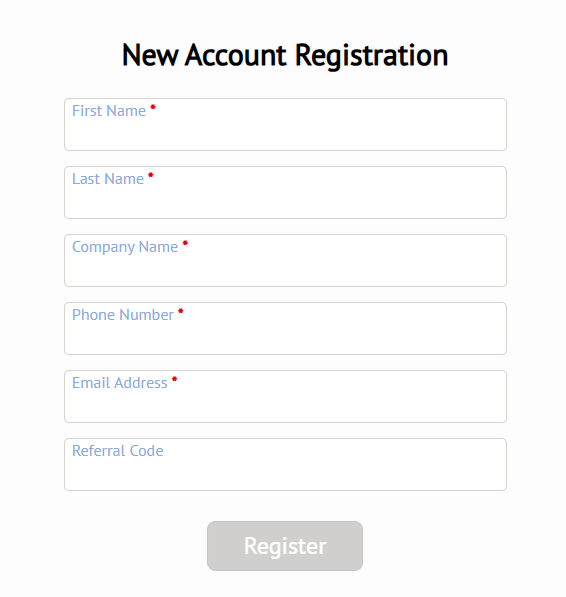
Step 4: This action opens up a simple registration form. Please complete this form and click the Register button.
How soon can the photos be taken after the order?
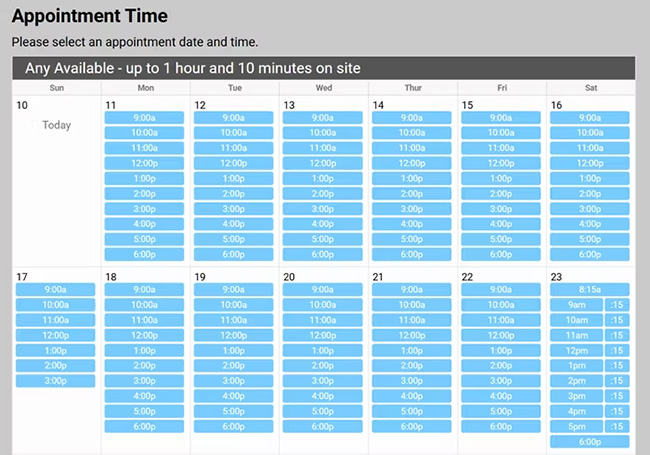
We have multiple photographers and can usually schedule the shoot within a day or two. You will find each photographer’s availability when placing your order.
What are the Travel Fees?
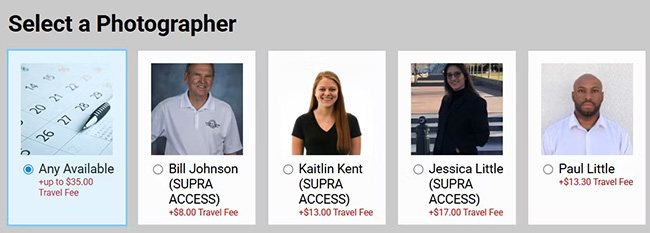
Each photographer sets their own service area and travel fee structure. When you place a photoshoot order, you will be presented with a list of available photographers who can capture your media.
The travel fee displayed beneath each photographer’s name is calculated based on the mileage from their residence to your listing.
100% of this payment is issued directly to the photographer.
What kinds of payments are accepted?
We proudly accept all major credit cards, including Visa, Mastercard, Discover, and American Express.

If you have any questions regarding your invoice or the payment process, please contact our Accounting department at Accounting@Snap2Close.com
Can I pay at closing?
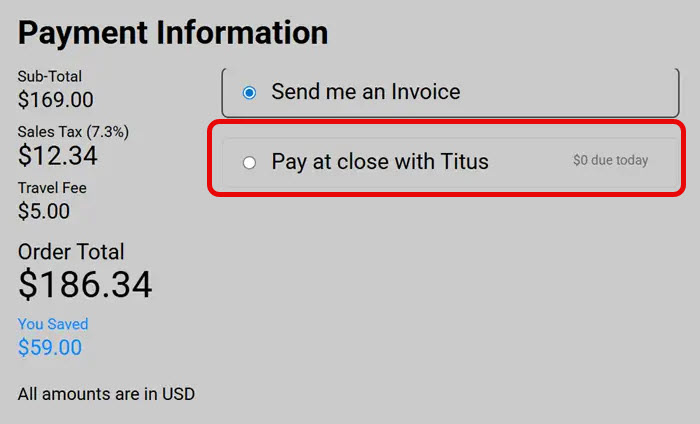
Snap2Close is pleased to offer you the option to Pay for Your Photoshoot at Closing through our partnership with TITUS. This service is fast and does not involve conventional credit checks. When completing your order form, you will have the choice to pay for your media upon delivery, at closing, or using another available payment option. TITUS is paid back at the close-of-escrow.
How do I download my invoice?
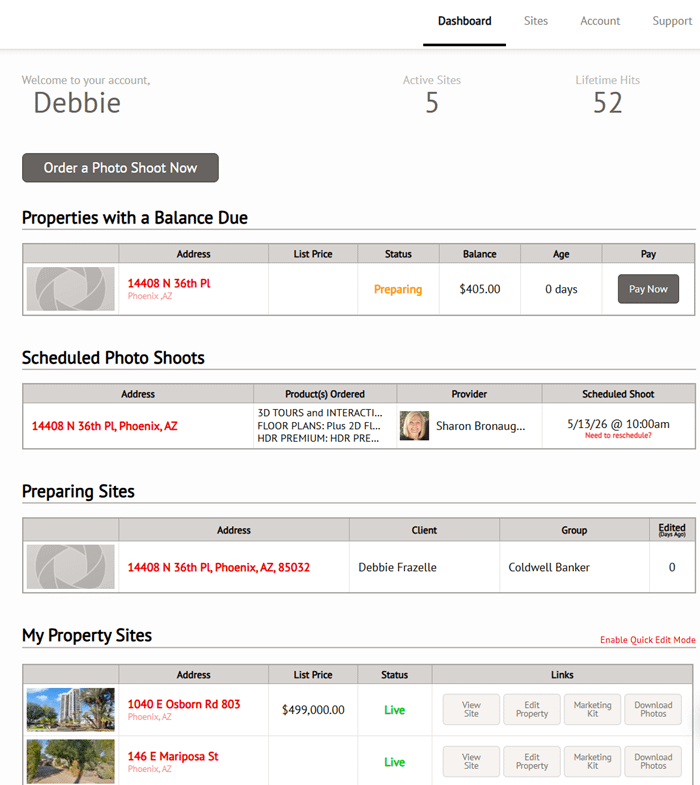
Once logged into the portal then please click your Dashboard. Scroll down the screen to My Property Sites. Locate the address for your photoshoot and then click on the address’s link or the Edit Property button.
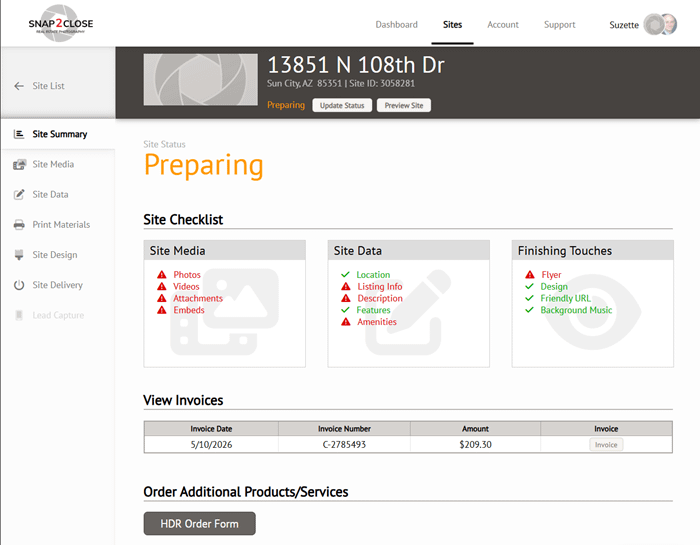
This action opens up your Site Summary. Scroll down the screen to View Invoices. Click the Invoice button on the far right column.
This action opens up your invoice and gives you the option to either print or email it.
Are your prices negotiable?
We price our services competitively and do not discount lower than what you see listed on our order page. From time to time we do offer incentives, and after placing your first order you will be eligible to receive these via email.
How do I find my orders?
Log in to your Snap2Close Portal at view.snap2close.com
Your Dashboard will provide you with a breakdown of your current and previous photoshoots.
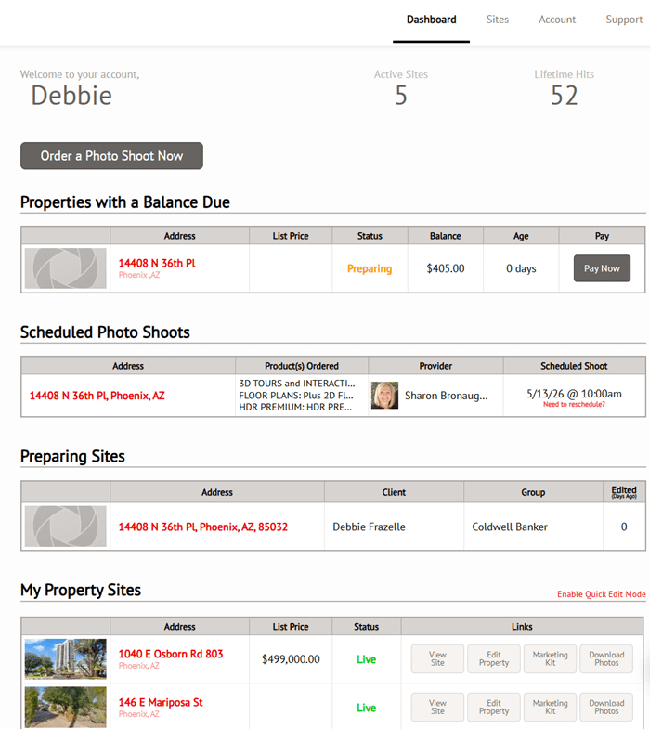
Rescheduling or Postponing Your Photoshoot
Snap2Close provides you with an easy method to reschedule your photoshoot.
Please follow these steps:
Log in to your account at View.Snap2Close.com
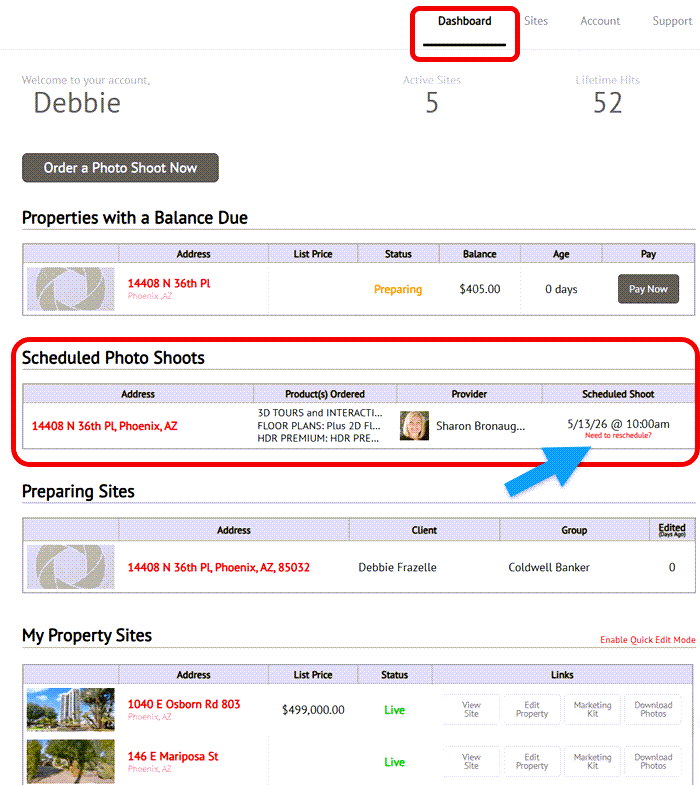
Please click Dashboard on the top menu.
he 2nd panel is entitled Scheduled Photo Shoots
Locate the address of the shoot you want to move.
Click the Need to Rescheduled link in the far right column.
A new window will appear entitled Reschedule Appointment. The information provided includes the current appointment time, the product or package you want to reschedule. (see image below)
If you want to temporarily postpone the shoot then please click the radio button for TBD.
f you want to reschedule then select the appropriate time from the calendar for your previously selected photographer. If you want view the schedules of other photographers then please click the “Check More Photographers” text link below the calendar.
Please feel free to add any additional information in the comment box.
Click Save Changes
Do I need to do anything to prepare the home for the photo shoot?
Yes, please click HERE for a printable list of how to prepare the home for photography.
The photographer is not responsible for preparing the home for photography. Cleaning, staging, arranging, and decluttering should be finished before the photographer arrives. The photo shoot is scheduled based on the time it takes to shoot a home that is photo-ready. If the home is not photo-ready the number or images or the quality of the images will likely suffer.
Do I need to be there for the photo shoot?
You will be sent an email and text with the time frame for the photo shoot. We do our best to allow for appropriate travel time between photo shoots but unforeseen occurrences (traffic, construction, accidents etc.) do come up. Please allow a 10 min buffer for the photographer to arrive. We will contact you if there is a delay over 10 min.
The home must be completely ready for photography when the photographer arrives.
It is advised that the home be as empty of people and pets as possible. Our wide angle lenses are tough to hide from and shuffling people/animals/stuff from room to room will take away time allotted for photography.
Garages are photographed only on request.
What are your turnaround times?
Weekday shoots:
- All photographs, 2D Floorplans, and 3D Tours within 24 hours.
- All videos, the interactive floor plan and pro virtual twilight within 48 hours.
- Pro Virtual Staging within 36 hours after your selection of the selected photos.
Weekend Shoots:
- Our editorial staff is off Saturday and Sundays. Delivery will begin on Monday morning.
How do I find my listing?
Log onto your account HERE. On the Dashboard you will find your shoot listed in the Schedule Photo Shoots panel.
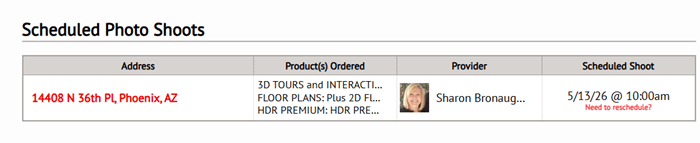
Click the photoshoot’s address which is in a red font. This action opens up your Site’s Summary page.
What if I need to cancel a shoot?
Things happen, we understand that. Appointments can be modified 24 hours before shoot date and time. If something happens and you need to reschedule, log onto your account HERE. On the Dashboard you will find your shoot listed in the Schedule Photo Shoots panel. In the right column you will find a the text “Need to reschedule” in a red font. Click that link.
Cancellation and Rescheduling Policy
Our photographers rely on a consistent schedule to maintain their livelihood. When a photoshoot is cancelled or rescheduled, it creates a gap in their calendar that is often difficult to fill on short notice. We provide flexible tools to manage your appointments. To ensure fairness to our professionals and other clients, we have established the following policy:
- 24+ Hour Notice or Change: Changes or cancellations made more than 24 hours before the scheduled photoshoot are free of charge, allowing us to offer the time slot to another agent.
- Late Cancellation Fee: Cancellations or rescheduling requests made within 24 hours of the appointment will incur a fee equal to 35% of the total photoshoot cost to compensate the photographer for lost income.
- Example Calculation: For a $200 photoshoot, a late cancellation fee of $70 (35%) would be applied to your invoice.
How will the photos be sent to me?
You will receive an email with a link to Download Media. This email will include your "Download Media" link, your "Property Website" links, a "Property Owner Preview" link, "Social Media" links, your "Referral Code" and link to access your account.
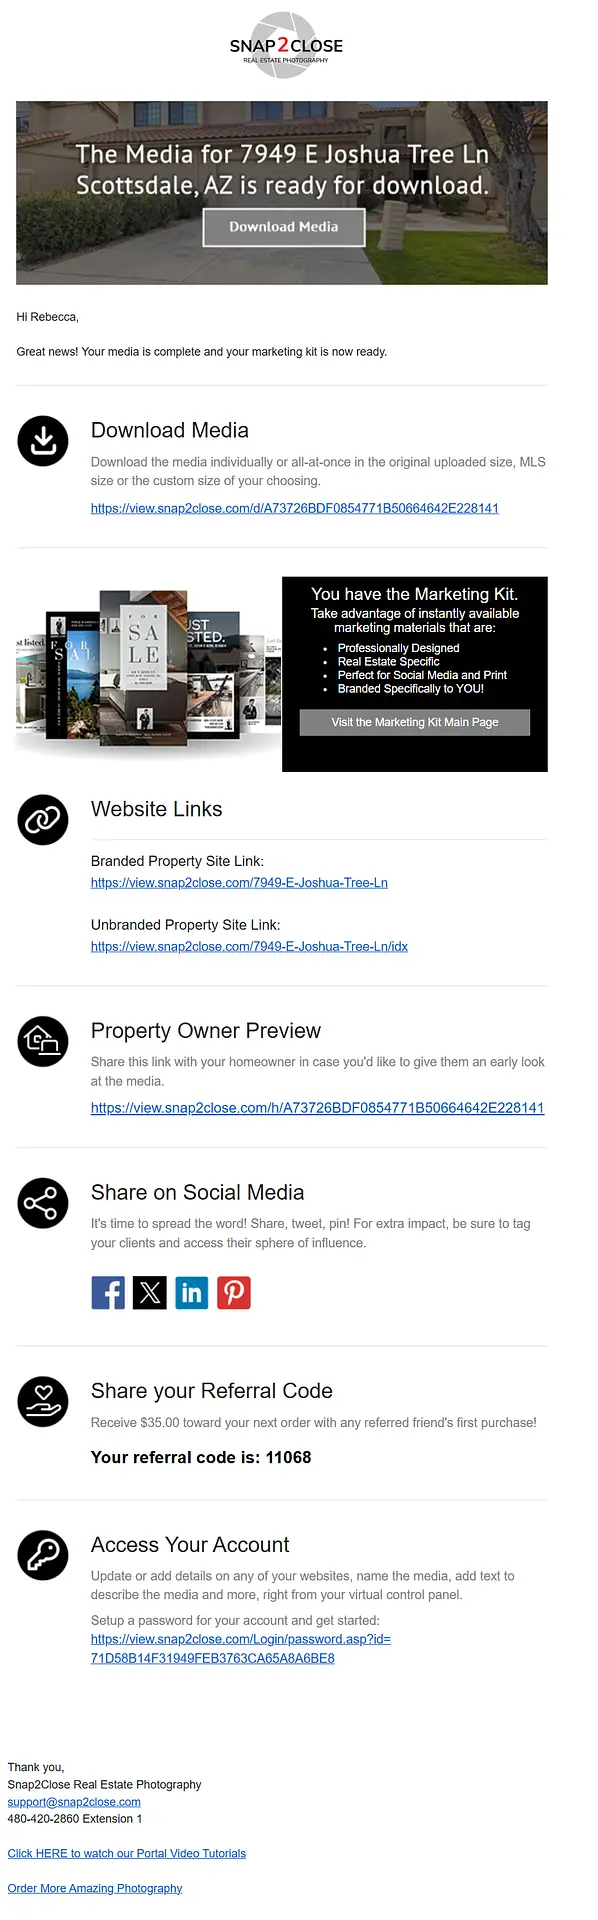
The files will be downloaded via .zip file, which is the fastest way to get the photos on your computer. You can watch a video about unzipping folders on Windows 11 by clicking this link.
How do I download my photos or other media?
Locate your photoshoot on your Dashboard screen. Click the address in the first column.
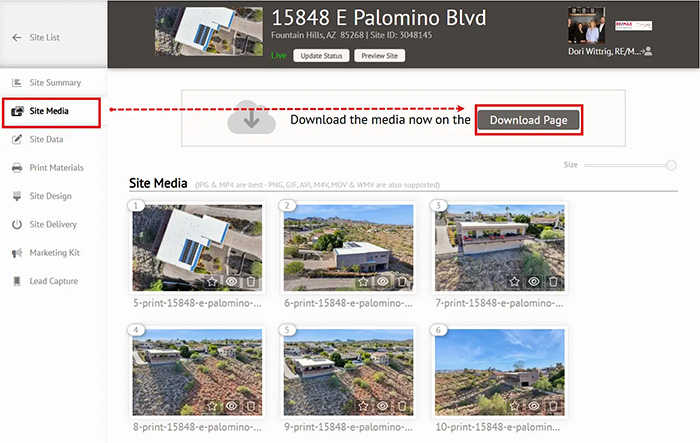
This action opens up your Site
Click the Download Page button on the right side of the screen. This action opens up a MEDIA DOWNLOAD CENTER WITH a Copyright License which you must accept.
You have the options of downloading Videos, Photos, and Floor Plans. Interactive Floor Plans and 3D Tours are hosted systems and cannot be downloaded. To have all of your media display on MLS then be sure to use your Unbranded Property Website as your Virtual Tour link. That link is located on the Site Delivery page, as well as on your Delivery Email.
How do I open a Zipped file?
This short video tutorial will show you how to unzip a folder on a Windows computer. Below the video are links to an external webpages with a more in-depth description.
Link to an article about unzipping folders on a Windows computer. Link to an article about unzipping folders on a Mac.
How do I download a single image?
Locate your photoshoot on your Dashboard screen. Click the address in the first column.
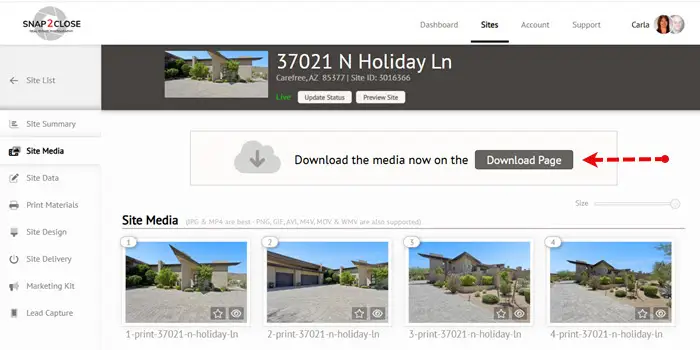
Click the address in the first column. This action opens up your Site. Select Site Media on the left menu. This action opens up your media page. On the right side of the screen is a Download Page button. Click that button.
This action opens up your MEDIA DOWNLOAD CENTER page. This page is divided into 4 sections.
- Embedded Media
- Download Videos
- Download All Photos
- Download Individual Photos
Scroll down the screen until you reach the Download All Photos section
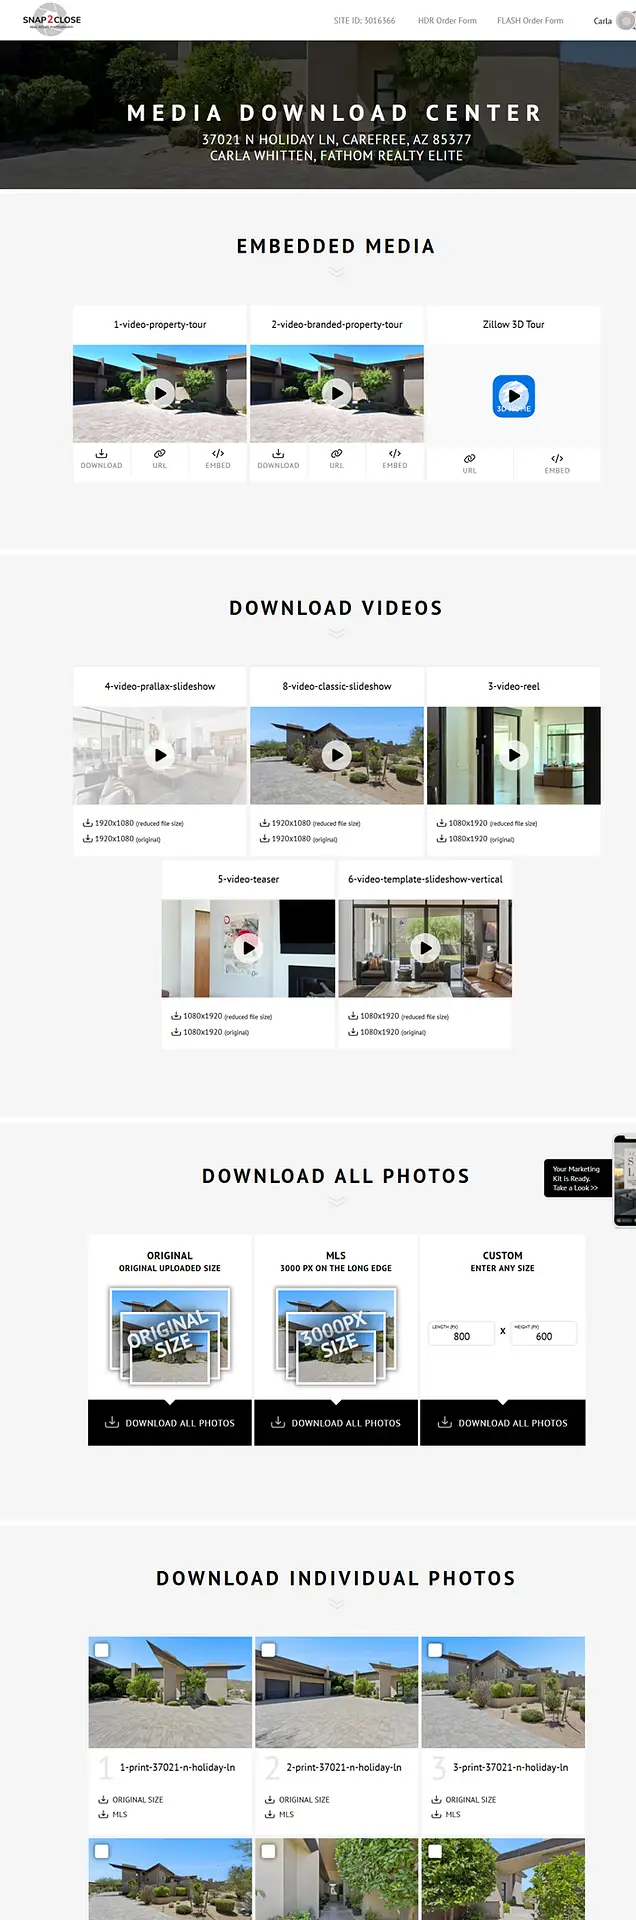
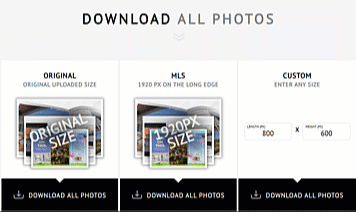
You can download single images by clicking down arrow for ORIGINAL SIZE (print ready images at a resolution of 300 pixels per inch) or MLS (for web and MLS at a resolution of 96 pixels per inch).
If you want to download selected images then add a checkmark at the top left corner of each image you want to download. You will then have the option to download the Original Size or the MLS versions.
How do I set custom sizes on Images for download?
Locate your photoshoot on your Dashboard screen. Click the address in the first column.
This action opens up your Site. Select Site Media on the left menu. This action opens up your media page. On the right side of the screen is a Download Page button. Click that button
This action opens up your MEDIA DOWNLOAD CENTER page. This page is divided into 4 sections. Scroll down the screen until you see DOWNLOAD ALL PHOTOS. The right panel is entitled CUSTOM – ENTER ANY SIZE
All images are based upon a image size of 3:2: An image aspect ratio of 3:2 means that the width and height of the image is in a 3:2 ratio. For example, the size of the image would be 3,000×2,000 or 1200×800. This image aspect ratio is suitable for most professional photography as most professional photographers shoot in this image aspect ratio. These images have a resolution of 96 pixels per inch and are perfect for website images.
How do I downloading videos?
Downloading videos is very easy. On the Dashboard you will find a panel called My Property Sites. Click the address of the property which is in a red font. Another option is to click Sites and locate the address there.
On the Site Media screen, click the Download Page button.
At the top of the Media Download Center will be your videos. If you have a Silver, Gold, Platinum and Titanium Package then Embedded Media will be at the top.
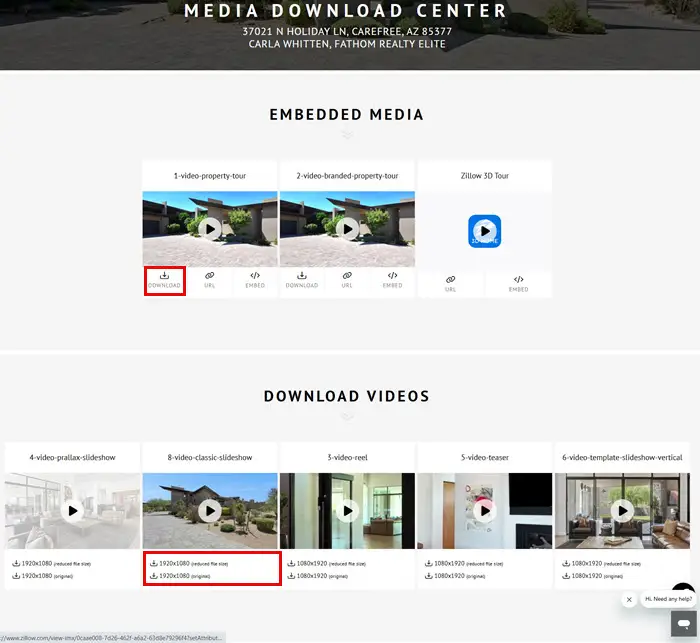
Each video has a down arrow beneath the video thumbnail. Click the arrow to download your media.
Note: The reduced file size will work to social media postings. The original size has a higher resolution and works well with Vimeo and YouTube.
Embedding Videos and 3D Tours on MLS
Silver, Gold, Platinum and Titanium Packages
Customers who select our Silver, Gold, Platinum, or Titanium Packages receive pre-generated embed codes for seamless integration. Bronze Package customers will find their instructions at the bottom of this section.
Click the Download Page button on the Site Media screen
At the top of the Download Media Center will be the Embedded Media section. Beneath each thumbnail there will be an Embed icon. When you click that icon, the embed code will be copied to your clipboard.
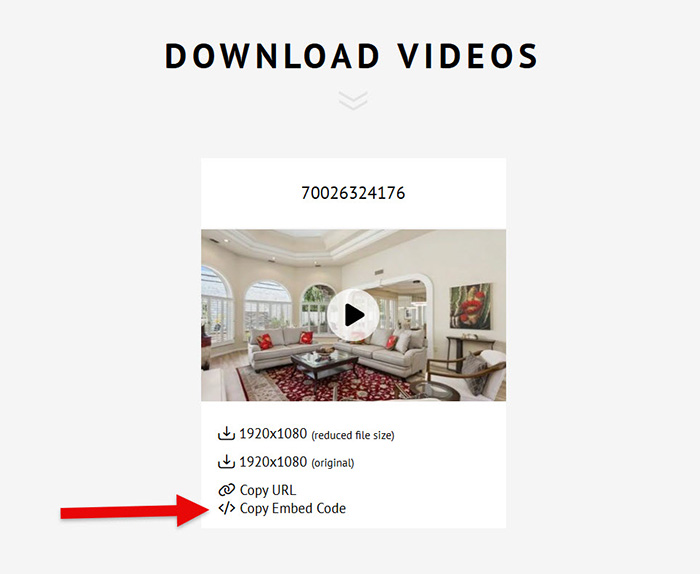
Paste that link in the video section of MLS and then give it a title.
Bronze Package customers can select the Site Media screen, scroll to the bottom of the screen to the Embedded Media – Lower Section
Paste that link in the video section of MLS and then give it a title.
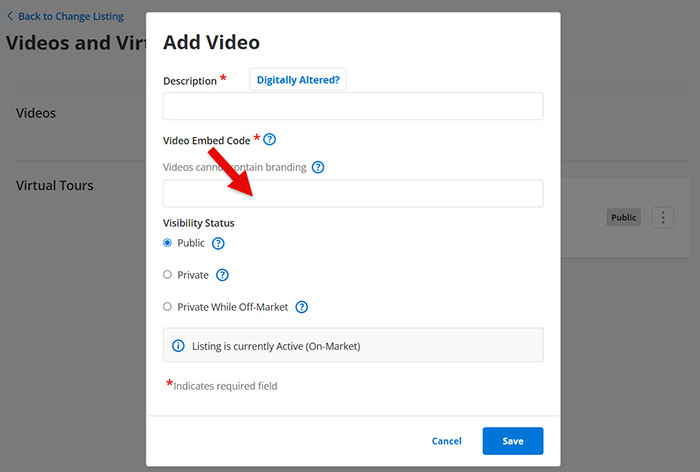
Bronze Package
On the Site Media screen, click the Edit button below the icon and then copy the URL link.
Simply paste the Video or 3D Tour link into the line of code below where it says “PASTE VIDEO LINK HERE.” Once the video link has been added you can then embed the video into MLS.

Who owns the photography?
The Copyright License grants you the authorization to "worldwide, limited, fully-paid license to use said photography for the purposes of marketing 8455 N 84th St, Scottsdale, AZ, 85258 for as long as Nathan Janecek, Keller Williams Realty Sonoran Living legally represents the property. The license does not grant or constitute a transfer of ownership of photos or any intellectual property rights held by Snap2Close Real Estate Photography.""
Snap2Close extends an offer for you to buy complete ownership for an additional $100.
The Copyright License Agreement does not allow you to sell or transfer the rights to the visual media produced by Snap2Close Real Estate Photography.
What is a property website?
A property website, or single-property website, is a dedicated, standalone website created to showcase a specific real estate listing, rather than a whole portfolio. It acts as a customized, distraction-free marketing tool—often with its own domain like 555MainSt.com—featuring high-quality photos, videos, virtual tours, and detailed information tailored to attract buyers.
Snap2Close provides it Silver, Gold, Platinum and Titanium Package customers a Branded and Unbranded Property Website. Our Bronze Package customers can upgrade their package to include our Marketing Kit, which includes the property websites, flyers, social media reels, slideshows and more. The upgrade is $39.95
The Unbranded property website should always be used as a Virtual Tour link on MLS.
What is the difference between Branded and Unbranded Property Websites?
The Branded Property Website includes your photo, logo, and contact information. This should be used for any advertisement of the property excluding the MLS, which has special rules prohibiting the display of agent information.
The Unbranded Property Website is stripped of your contact information but does contain all other home information and images. This tour is in compliance for use with the MLS.
How do I edit the Property Website?
Snap2Close provides you with many property website editing tools. To begin login to your portal. Next, select the Site Design menu item on the left side of the screen.

You have three key editing features that you can use.
- Website Design
- Friendly Web Addresses
- Background Music
Website Design
Snap2Close provides you with 10 different website design styles. You can preview the default style by clicking on the Open Preview button.
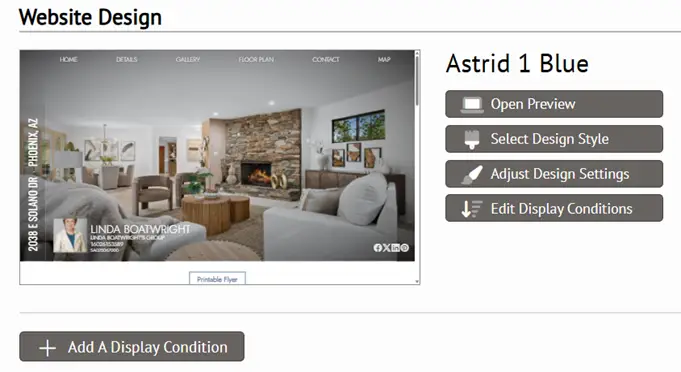
You can preview other design styles by clicking the Select Design Style buttom.
Each Design Style feature various color conditions. This will help you to match the colors with your brokerage.
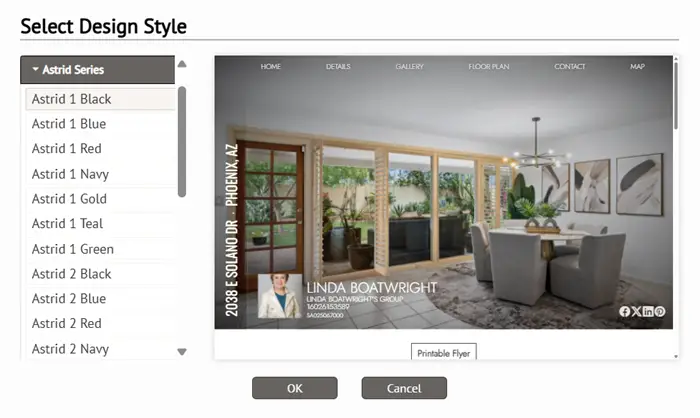
There are some more complex Design Settings and display conditions that are available . If you need assistance with these features then please contact us a support@snap2close, our chat box or by telephone at 480-535-8146.
Friendly Web Addresses
By default we provide you with two website links for your Branded Property Website. The first is generic and the second is a customizable link.

Feel free to change the address component to your preference. Click the Save button when you are finished. This change will be displayed on your Site Delivery menu screen.
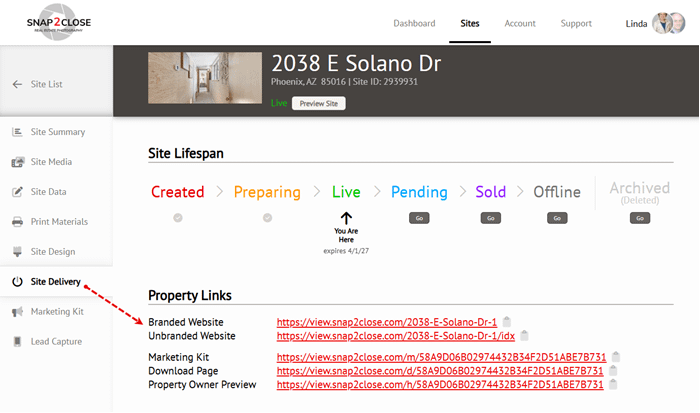
To select your Background Music
Snap2Close provides you with more than 80 sound tracks to use for your background music.
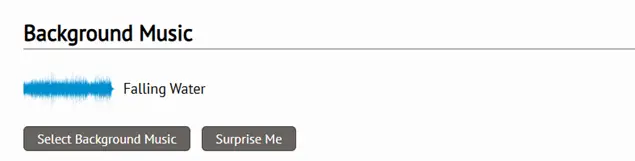
To change the music the please click the Select Background Music button. This action will open up a music selector box. To listing to the music then point your mouse over the selected choice.
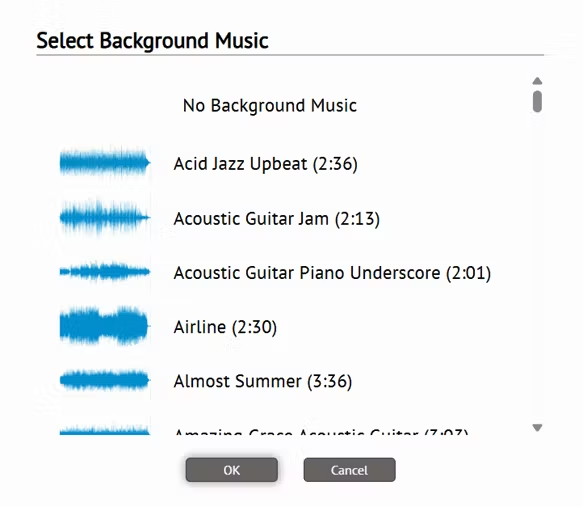
It is important to note that the music selected here will be the default background music used on slideshows you create on the Marketing Kit.
One of the many features of using Snap2Close for your business is the ability to use music on your client’s property sites and social videos. Snap2Close has secured an Enterprise license with StoryBlocks so that you may include our provided music tracks on any of the property sites or social videos generated on the Snap2Close platform. These property sites and social videos can be shared freely with the included music without fear of copyright infringement by a third party. It is a worry-free license with the highest level of legal coverage in the industry!
You can view the full licensing agreement by clicking here.
When you use the Snap2Close provided music tracks, you can rest assured that the music content is safe to use on all of the property sites and social videos for your clients. Unfortunately, this licensing does not prevent other people from incorrectly claiming that your property site or video violates a copyright. Copyright claims (on sites like YouTube) occur on a regular basis, regardless of where the creator got their music. However, if you do get such a claim, please go ahead and dispute the claim based on the steps provided in the copyright claim notice.
How do I add captions to the images?
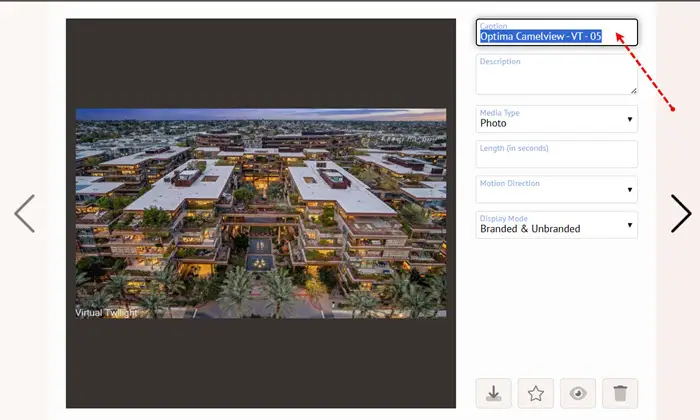
Adding captions to your media is extremely easy. Select Site Media for your new Site. Click the the image you want to add the captions to.
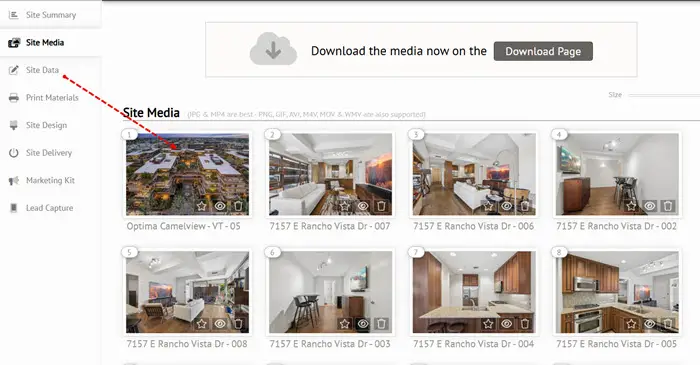
This action will open a new pop-up window. Enter the caption in the top text box. You may also enter a longer text description which will appear beneath the caption on the property websites.
Where can I find the Property Website Analytics?
Property Website Analytics is located in the Site Summary.
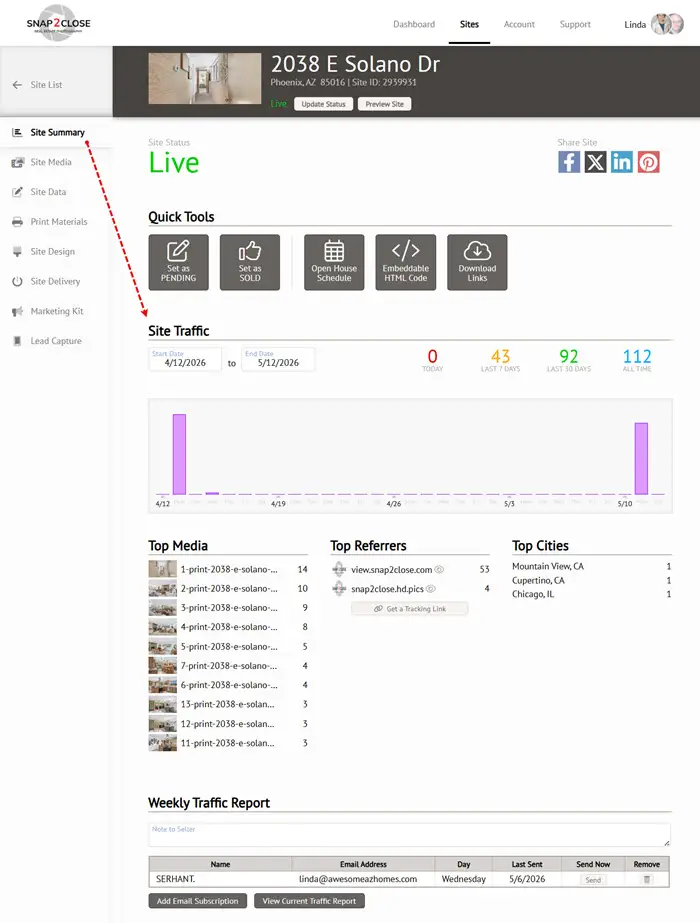
Weekly Traffic Report for Your Clients
At the bottom of the screen you will find a button for View Current Report. Clicking this button will upload a professional appearing traffic report. Click here to view a sample.
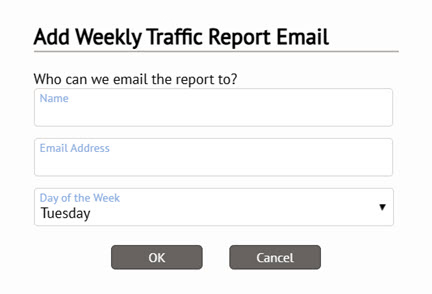
You have the option to send this report to the owner on a weekly basis by clicking the Add Email Subscription button.
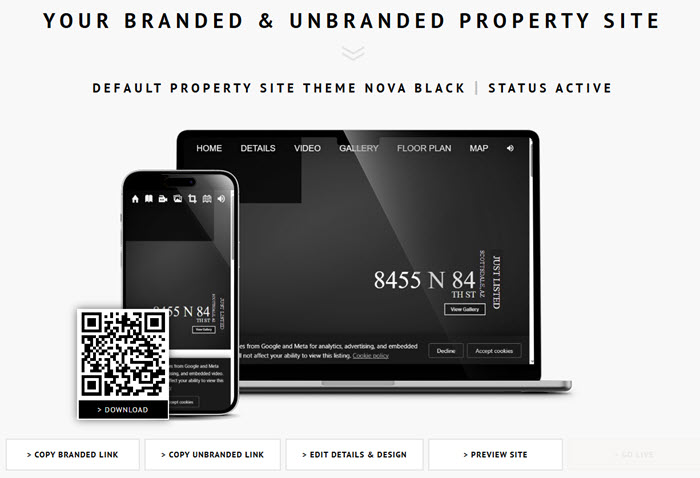
Do you provide QR codes?
The Marketing Kit includes a QR Code for each property website style. Once you have selected your preferred style and layout then you will find the QR code for oru selection.
Professional Photography and Social Media Images and Videos
This video overview provides a theoretical overview of how our Marketing Kit and assress your social media needs.
What can I do with my Marketing Kit?
The Marketing Kit provides real estate agents with a turnkey, automated suite of promotional materials, including single property websites, social media reels/videos, and editable flyers. It accelerates marketing efforts by instantly generating branded content from uploaded photos, allowing agents to easily edit details like pricing or sale status.
Key features and benefits of the Snap2Close Marketing Kit include:
- Social Media Acceleration: Automatically generates vertical video reels (9×16), slideshows, and branded posts for Instagram, Facebook, and TikTok.
- Automated Property Websites: Creates branded, mobile-responsive single property websites to showcase listings without manual design work.
- Lead Capture:Integrates a lead capture system within property websites to help agents generate potential client leads.
- Editable Flyer Builder: Provides customizable, drag-and-drop flyer templates that automatically pull in listing details and photos.
- Analytics & Reporting: Delivers weekly traffic reports to help agents monitor listing engagement.
This real estate media delivery tool also offers specialized marketing elements like Pinterest towers and easy-to-use virtual flyer designers to create marketing materials in minutes.
How to Preselect Preferred Photos and Music
It is recommended to select your preferred photos and music before you begin editing any of your Marketing Kit templates.
Please click the Pause icon before closing this window.
Marketing Kit Layout
The Marketing Kit will open in a new tab for you.
The most important feature is to update your Profile and Property Information.
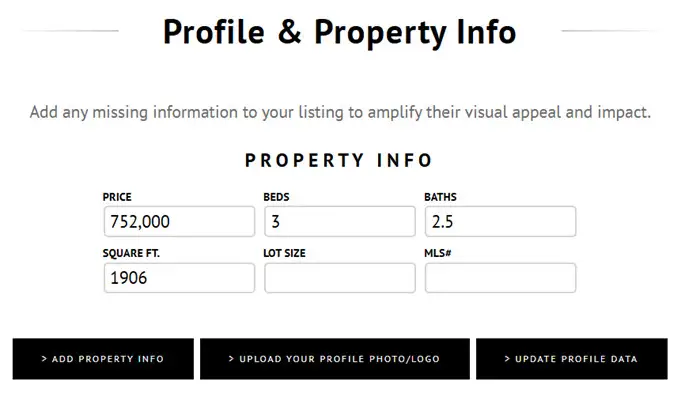
Once updated then refresh your browser. This will ensure that the information us updated.
Your Marketing Kit consist of the following dynamic and editable templates:
Social Media Reels – 30 Templates
Stories & Posts – 17 Templates
Square Posts – 10 Templates
Pinterest – 1 Template
Slideshows – 26 Horizontal and Square Templates
Property Websites – 14 Templates
Print Ready Booklets – 1 four page Template and 2 eight page templates
Print Ready Flyers – 17 Templates
PWebsite Weekly Traffic Reports
Best Sizes for Social Media Posts
For maximum engagement in 2026, the best post sizes are vertical. Use 1080 x 1350 px (4:5 ratio) for Instagram and Facebook feeds to maximize screen space. For TikTok, Instagram Reels, and Stories, use 1080 x 1920 px (9:16 ratio). Square (1080×1080) remains standard, but vertical formats outperform.
Best Sizes for Social Media Posts
>Instagram & Facebook:
- Feed Posts: Portrait (4:5) at 1080 x 1350 px is recommended to take up more screen space.
- Stories & Reels: 1080 x 1920 px (9:16) is required for full-screen display, as detailed in the 2026 Instagram sizes guide.
- Profile Pictures: 320 x 320 px.
TikTok:
- Videos & Thumbnails: 1080 x 1920 px (9:16) is the standard for full-screen mobile viewing.
This video explains the best image sizes for Facebook and Instagram ads:
How to Edit Social Media Reels
This video tutorial will illustrate how you can easily edit the Reels Templates
Please click the Pause icon before closing this window.
Adding Videos to Social Media Reels
Some of the Social Media Reel Templates can be modified from a photo slideshow and be replaced with a video.
Please click the Pause icon before closing this window.
Stories and Posts
Stories & Posts are graphic images and designed to be used for Facebook Stories, Instagram Reels, TikToks and more.
Instead of creating slideshows or using videos, these templates are designed for you to quickly edit and post content on Social Media. The editing tools are the same as demonstrated in our Reels video.
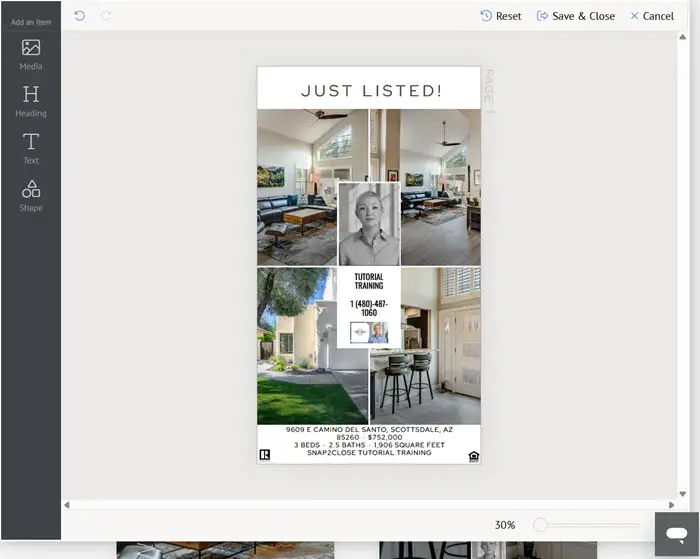
Landscape Posts
Horizontal Landscape Post templates are perfect for Facebook posts and display adds.
Please click the Pause icon before closing this window.
Square Posts
Square posts (1080×1080 pixels) are best suited for Instagram and Facebook because they offer high versatility across mobile and desktop feeds, ensuring images remain uncropped in Instagram grids. They are also highly effective for X (Twitter) and LinkedIn, providing a balanced, optimized look in fast-moving feeds.
Best Platforms for Square Posts
- [Instagram (1:1 Ratio): While portrait (4:5) is often favored for engagement, 1080×1080 pixels remains ideal for maintaining a clean, symmetrical grid aesthetic.
- [X (Twitter): 1200×1200 pixels allows for in-feed images that are clear and impactful, according to Buffer’s guide.
- LinkedIn: Similar to Facebook, square, text-heavy images, or quick graphics (e.g., carousels) work well in the professional feed.
Optimal Sizes & Tips
- Standard Size: 1080 x 1080 pixels is the standard for high-quality, crisp, and fast-loading images on most platforms.
- Design Tip: Because square formats are symmetrical, they work best when you focus on centered, simple compositions rather than relying on the rule of thirds, as advised by Figma’s guide.
- Why They Work: Square images are ideal for product photos and graphics because they maximize screen real estate on mobile devices without being too overwhelming, making them ideal for engagement, say Buffer and Figma.
Slideshows
Every Marketing Kit includes both a Branded and Unbranded Photo Slideshow. While all of these slideshows feature animated text graphics, none of them feature any Ken Burns styled pans and zooms or motion transitions. Those features are provided in the Snap2Close Classic Slideshow Video, which is included in our Gold, Platinum and Titanium Packages.
The Marketing Kit slideshows do not include any vertical slideshow formats as they are included in the Social Media Reels section.
This video tutorial uses an A.I. voice from Google. I hope you enjoy it.
Please click the Pause icon before closing this window.
Branded & Unbranded Property Websites
This video tutorial is our longest, but it also the most important.
Please click the Pause icon before closing this window.
Print Ready Brochures, Booklets and Flyers
Please click the Pause icon before closing this window.
Website’s Weekly Traffic Report
Please click the Pause icon before closing this window.
Understanding the Weekly Traffic Report
The weekly traffic report is a great tool to provide to your client that allows them to see the traffic that their property website is receiving! They can see the sites that their property website is being viewed from, the location of the viewer, and even the most popular media within the website! To ensure that you can relay the full value of the report to your client, let’s take a look at what the information means on the report!
sBefore we dive into each section, there are a few things to note in regards to the verbiage used in the Weekly Traffic Report
Hits – refers to the number of times a person clicked on a property website link and brought up the property website.
Views – refers to the number of large photos viewed by a person that clicked on the image in the Media Gallery to view it larger.
Traffic For The Week: The “Traffic For The Week” section displays the number of photo views in the property website within the last week.
Weekly Traffic History:
The “Weekly Traffic History” section displays the number of photo views in the property website over the last 13 weeks.
Most Viewed Media:
The “Most Viewed Media” section displays the top 6 viewed images for the property website. This is tracked by the number of views for each image. So when a person is looking at the Media Gallery and they select an image larger, that is recorded as a view.
Traffic By City:
The “Traffic By City” section displays the number of hits recorded within a certain city for the life of the property website so far. This section will display the top 7 cities and then an additional section for the remaining hits in the number of additional cities.
Top Referring Websites:
The “Top Referring Websites” section will show you the top 5 websites that the property website has been hit from, with an additional section for all remaining referring websites. This is displayed as a percentage of the overall hits and for the life of the property website so far.
Visitors This Week:
The “Visitors This Week” section is going to give you a breakdown of the visitors that hit the property website this week. “New Visitors” refers to the number of people that have never looked at this property website before. “Returning Visitors” refers to the number of people that have looked at this property website in the previous weeks and clicked to look again this week. Finally, “Total Visitors” will display the total number of people, both new and returning, and clicked to look at the property website this week.
Please click the Pause icon before closing this window.
This tutorial explains how to set up your agent profile on SnaptwoClose to enhance your branding and marketing materials.
By adding detailed information like a professional headshot, logo, contact details, and biography, the system automatically includes this in flyers, social posts, and listing sites.
It emphasizes the importance of a complete profile in establishing yourself as a trusted local expert, guiding buyers and sellers through the property journey.
Taking a few extra minutes to complete your profile ensures consistent branding and storytelling across all marketing materials.
This tutorial provides step-by-step instructions for setting up your profile, including uploading photos and selecting default designs. It highlights the impact of integrating your headshot, logo, and information seamlessly into your branding efforts. The ultimate goal is to establish trust and recognition with clients by personalizing your marketing materials.
Want your face, brand, and contact information automatically placed on every single one of your listing sites? It only takes 5 minutes.

Billing Address
We suggest that you enter your Billing mailing address in the section.
Social Media
This is an important category as it will expedite your posting of images, videos, etc., on your social media accounts.
Account Photos & Logos
Uploaded headshots or personal photos of yourself will be automatically added to your Branded Property Website, as well as videos that can also be branded.
Default Design & Flyer
If you create a custom website design or flyer then you will add those links here.
Left Menu
A Client Listing Page is a dedicated, public-facing portal or website feature that compiles and showcases all active property listings for a specific real estate agent or brokerage. Instead of just giving an agent a single website for one house, this feature acts as their personal portfolio page for all the properties you have photographed or created media for on their behalf. Plus, it provides you with its own URL web address

This section allows you to quickly acess a list of your Purchase History and Account History. The purchase history section allows you to select a start and end dates. The resulting table provides you a column for Invoices. Simply click the Invoice icon and it will open the invoice for you.

The account acess logs your last 10 login transactions

This field shows you your current active credit card, plus it allows you to enter a new carfd.

If there are unpaid invoices then they will appear on this report.

This section allows you to update/change your password.
If you use the Marketing Kit then you can automatically sync your account to YouTube or Vimeo. This action automatically updates any videos you create in the Marketing Kit to these Cloud Video Providers.

Snap2Close Real Estate Photography
14362 N Frank Lloyd Wright Blvd, Suite 1000 Scottsdale, AZ 85260
Support: Call or Text: 480-535-8146
Email: Support@Snap2Close.com
Administrative Telephone: 480-420-8260
OFFICE HOURS
Support:
Monday-Friday 6AM-5PM
Saturday 8AM-5PM
Sunday 8AM-Noon
Photographers:
Monday-Saturday 8AM-5PM
SERVICES
HDR Photography
Synergy Flash Photography
Floor Plans
Aerial Drone
Videos (MLS & Social Media)
Interactive Media
3D Tours
Virtual Staging & Renovation
Marketing Kits & Social Media
COVERAGE AREAS
Phoenix
Scottsdale
Paradise Valley
Mesa
Chandler
Glendale
Peoria
Tempe
Surprise
Buckeye
©2026 Snap2Close Real Estate Photography LLC